🪄 RUN EVERYWHERE
Contents
🪄 RUN EVERYWHERE#
The recommended work-flow is to run the macros from gaeuidc1.ciemat.es (connecting by ssh). If this is not possible you can run the macros from gaejupyter or from your local computer. In this section we explain how to do it.
GAEJUPYTER 🌐#
It is possible to run from any browser with a CIEMAT tool, you only need a afs user.
Type in your browser:
https://gaejupyter.ciemat.es/

And introduce your afs credentials. You will access to a launcher from which you can use terminals or jupyter notebooks as usual.

Open a terminal and insert the following commands:
Select the path directory you see on the left sidebar:
cd /home/nfs/user/**yourafsuser**
Clone the repository in your folder:
Go to your home directory cd /home/nfs/user/**yourafsuser** and run
git clone https://github.com/CIEMAT-Neutrino/SCINT.git
This way, we clone the repository to a location where you can move through the files (the SCINT folder should appear in the sidebar).
If is not the first time you are using the macros make sure you are using the last version and run:
git fetch
git reset --hard HEAD
git pull
⚠️ This will RESET ALL YOUR local changes ⚠️ and get the last version of the main branch of the repository.
Setup the virtual environment and install the needed packages to run the macros:
cd SCINT
source setup.sh
You should activate it each time you log in and want to use the python version installed there with source /home/nfs/user/**yourafsuser/SCINT/.venv/bin/activate, whenever you want to deactivate it and run deactivate.
Everything is prepared to run the macros and for that you can follow the structure that follows:
cd srcs/macros
python3 XXmacro.py (--flags input)
In the input file you should introduce the information of the runs you want to analyze:
# Do not use spaces " " except between KEYWORD and input variables
# If input variables are a list, use "," as a separator
########################
####   DAQ INFO     ####
########################
TYPE: ADC
MODEL: 5725S
BITS: 16384
DYNAMIC_RANGE: 2
SAMPLING: 4e-9
########################
####   RUNS INFO    ####
########################
RAW_DATA: DAT
RAW_PATH: data/BASIC/raw
NPY_PATH: data/BASIC/${USER}/npy
OUT_PATH: data/BASIC/${USER}

OV_LABEL: OV1,0V2,0V3
CALIB_RUNS: 01
LIGHT_RUNS: 09
NOISE_RUNS: 17,128
ALPHA_RUNS: 25
MUONS_RUNS: 29
CHAN_LABEL: SiPM0,SiPM1,SC
CHAN_TOTAL: 0,1,6
CHAN_POLAR: -1,-1,1
CHAN_AMPLI: 250,250,1030
########################
####   BRANCH INFO  ####
########################
#PRESETS USED: 0,  1,  2,  3,  4,  5,  6
LOAD_PRESET: NON,RAW,ANA,ANA,CAL,EVA,ANA
SAVE_PRESET: NON,RAW,ANA,CAL,CAL,NON,DEC
########################
####  CHARGE INFO   ####
########################
TYPE: ChargeAveRange,ChargePedRange,ChargeRange
REF: AveWvf
I_RANGE: 0.1,0.1,0.1,0.1,0.1
F_RANGE: 0.4,0.9,1.9,2.9,3.9
PED_KEY: PreTriggerMean
########################
####   CUTS INFO    ####
########################
#0CUT_CHAN: 0
#0CUT_TYPE: cut_df
#0CUT_KEYS: AnaValleyAmp
#0CUT_LOGIC: bigger
#0CUT_VALUE: 0
#0CUT_INCLUSIVE: False
LOCAL COMPUTER 💻#
Linux#
All the previous instructions are based on a Linux operating system. In summary to run the macros you will need to type:
cd srcs/macros
python3 XXmacro.py (--flags input)
MacOS#
You need to install the sshfs command (link) and adapt the installation commands from linux to your system. Everything else should work as in Linux.
Windows#
The procedure is very similar, here we summarize the principal steps to follow:
Install Git (to clone the repo)
Clone the repository:
OPTION#1
Open command palette
Type clone (git)
Introduce the direction of the repository (https://github.com/CIEMAT-Neutrino/SCINT.git)
Choose the folder to allocate the repository and open
OPTION#2
From the TOOL_BAR select Terminal
Open a new one and select the
+vbottomChoose
Git Bashand run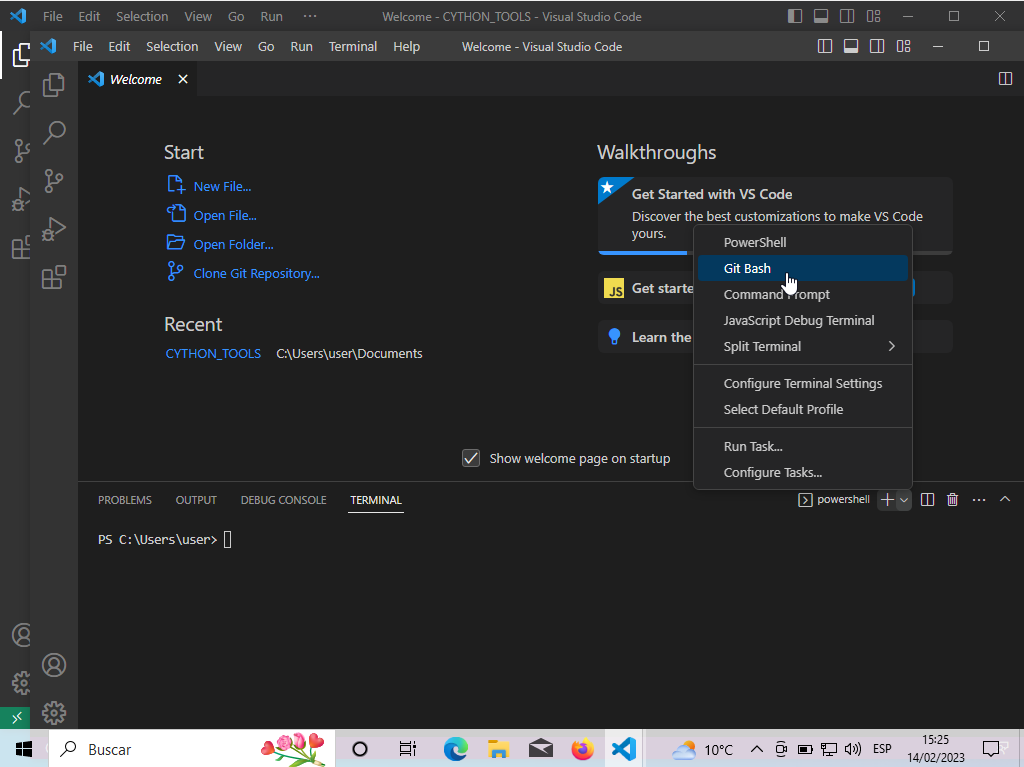 git clone https://github.com/CIEMAT-Neutrino/SCINT.git cd SCINT code .
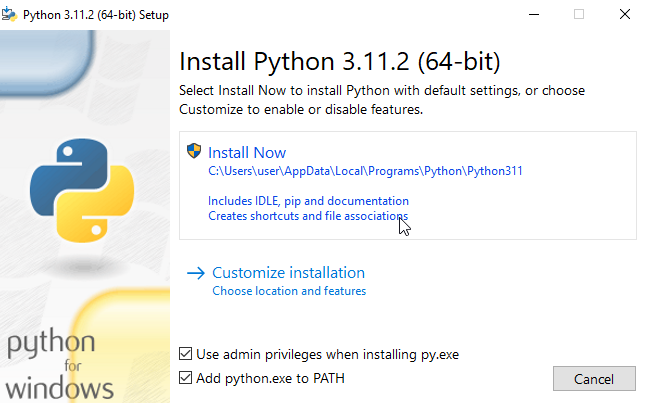
Install python,pip3 [Install the recommended extensions for Python (VSCode suggestions)]
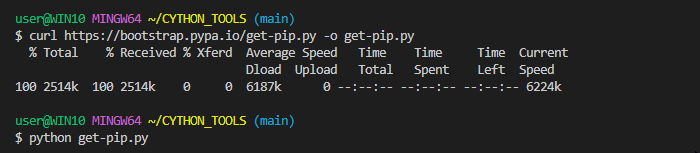
curl https://bootstrap.pypa.io/get-pip.py -o get-pip.py
python --version
OUTPUT --> Python X.XX.X
python -m pip install --upgrade pip
Open cmd as administrator + VSCode WSL Extensions
wsl --install
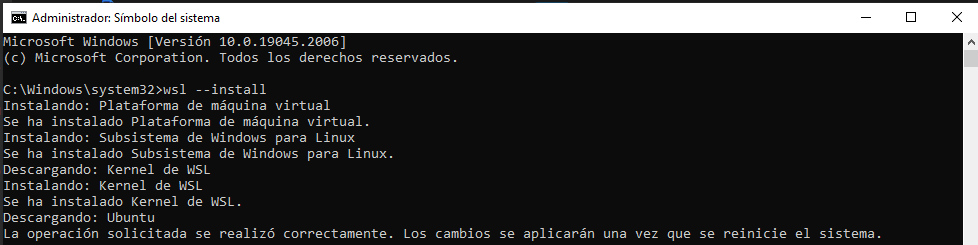
Ideally with
wslyou can open VS (code .) and run the commands as in Linux. You need to check thatsshandsshfscommands work correctly and if not, install them.